netty源码分析一
javadoop源码分析系列的笔记,建议查看原文:https://www.javadoop.com/post/netty-part-1。
零、概述
概述详见:Netty概述
一、环境配置
准备环境maven、springboot、netty-example(相比netty-all简单,在解决依赖的同时,有一些小例子来学习)。
pom.xml
<dependency>
    <groupId>io.netty</groupId>
    <artifactId>netty-example</artifactId>
    <version>4.1.69.Final</version>
</dependency>
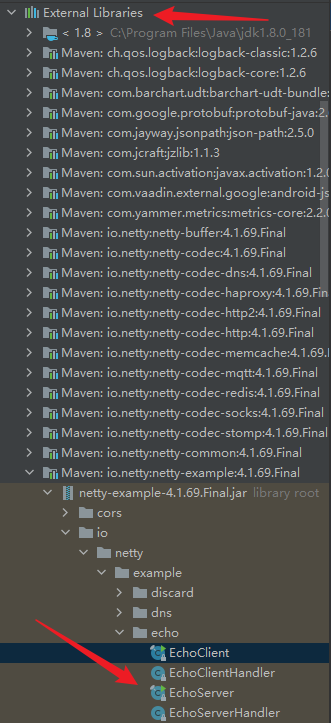
然后就可以在jar下面找到对应的例子源码:
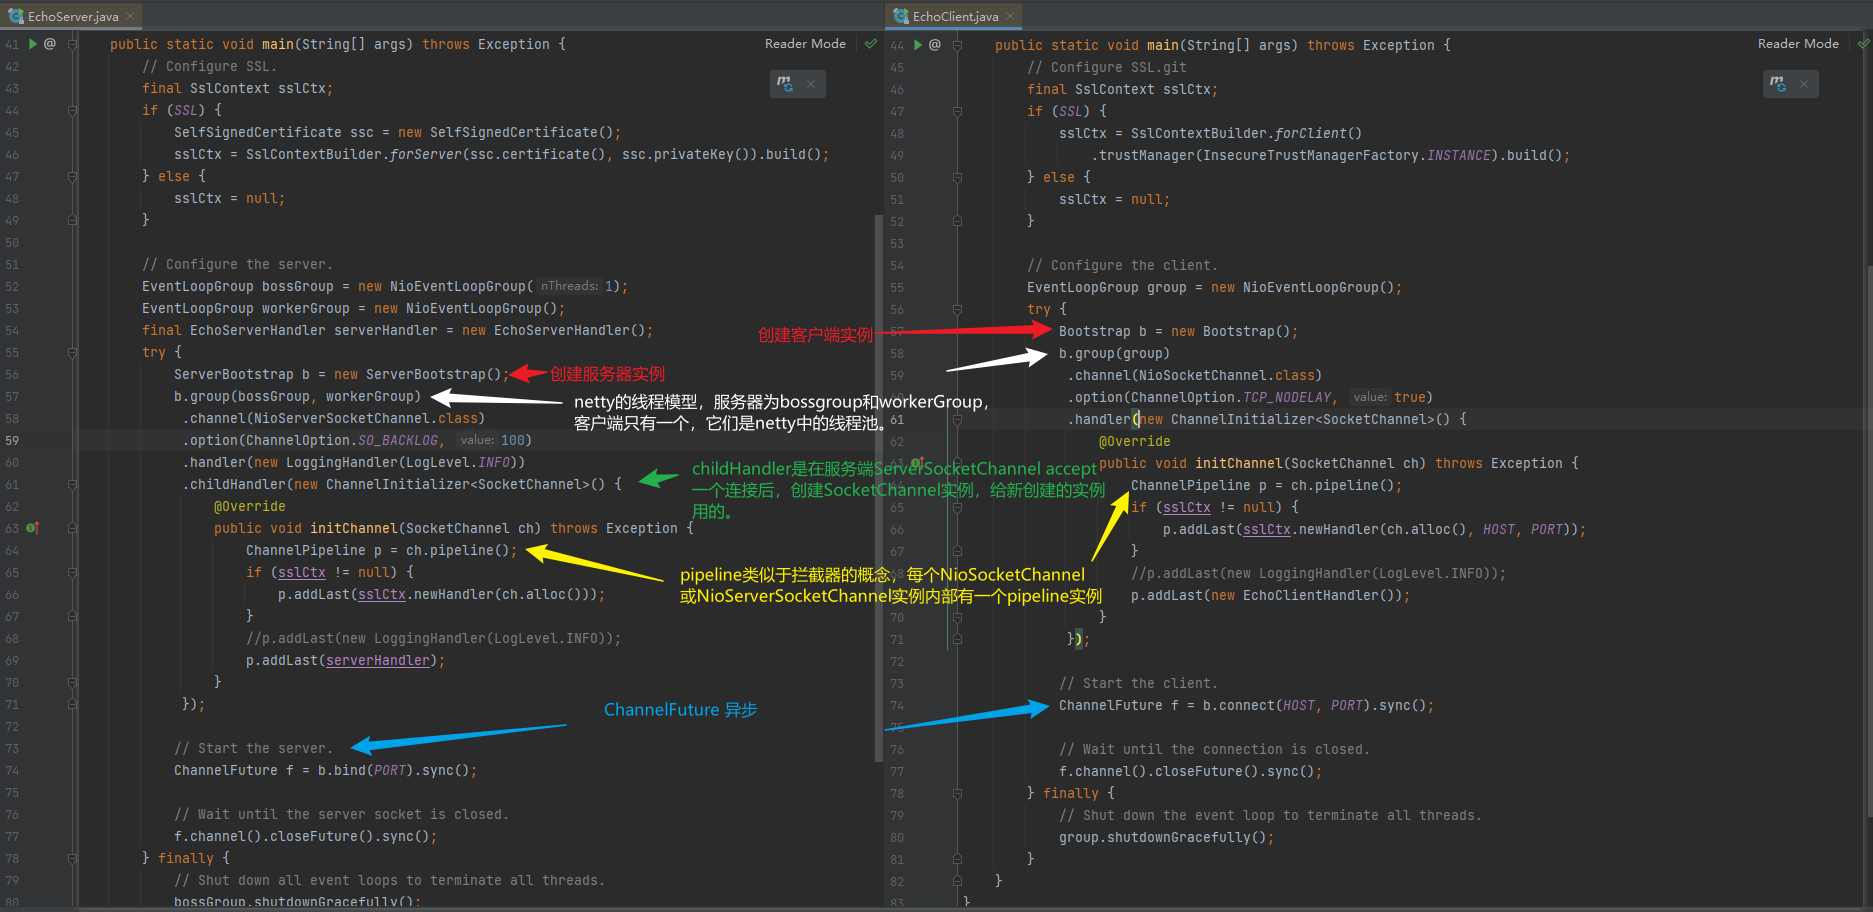
echo例子:
二、netty的channel

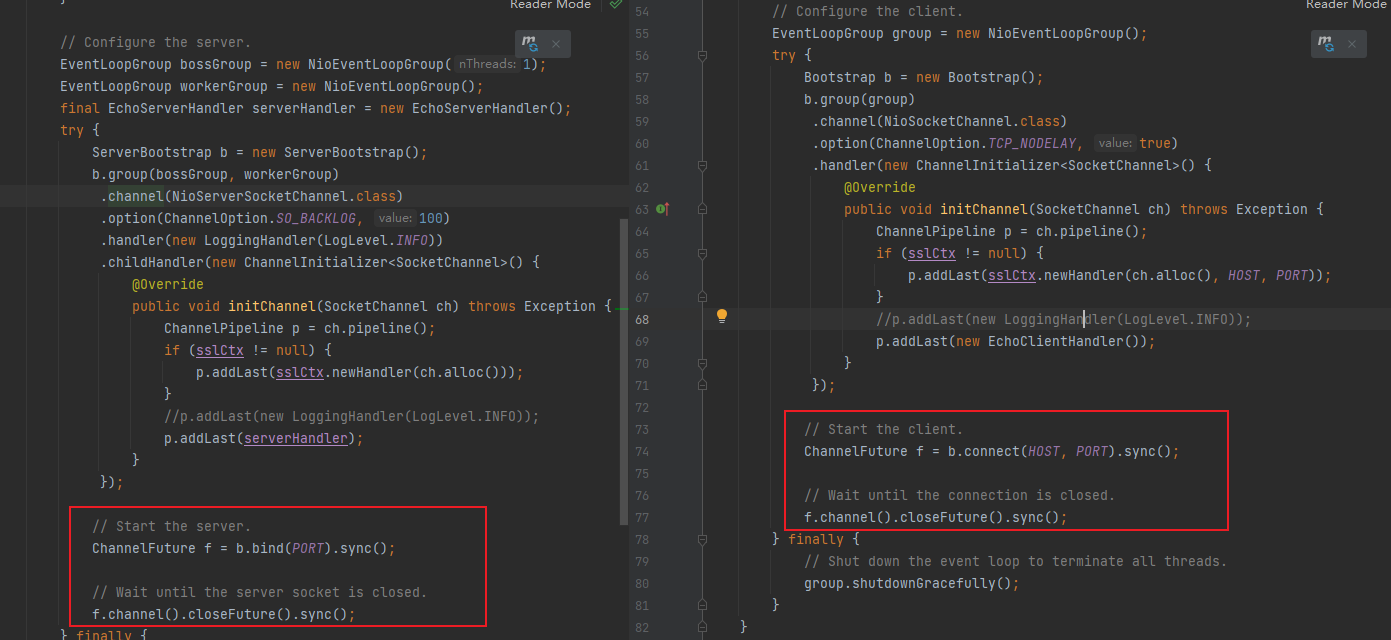
服务端和客户端启动过程都会调用channel()方法。
进入查看源码:
private volatile ChannelFactory<? extends C> channelFactory;

public B channel(Class<? extends C> channelClass) {
    return channelFactory(new ReflectiveChannelFactory<C>(
            ObjectUtil.checkNotNull(channelClass, "channelClass") // 判空
    ));
}

@Deprecated
public B channelFactory(ChannelFactory<? extends C> channelFactory) {
    ObjectUtil.checkNotNull(channelFactory, "channelFactory");
    if (this.channelFactory != null) {
        throw new IllegalStateException("channelFactory set already");
    }

    this.channelFactory = channelFactory;
    return self();
}
这里只是设置了channelFactory为ReflectiveChannelFactory的一个实例。
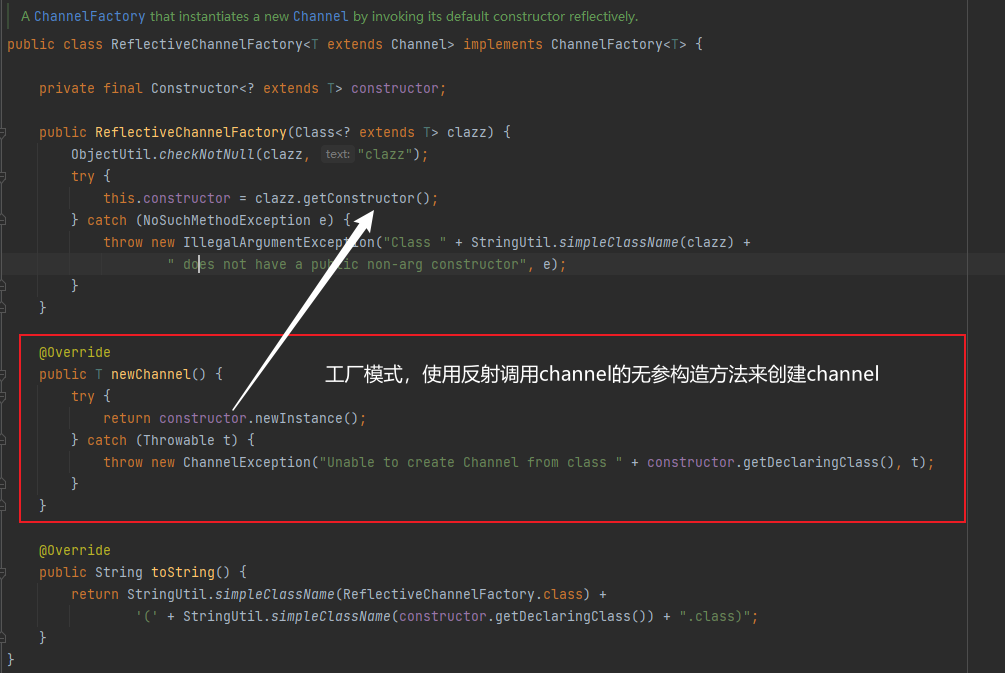
newChannel()方法只有在initAndRegister()中才会用到。

而initAndRegister()兜兜转转被客户端connect和服务端bind调用:

channel的调用参数一般是NioSocketChannel或者NioServerSocketChannel

那么NioSocketChannel是个啥呢?
private static final SelectorProvider DEFAULT_SELECTOR_PROVIDER = SelectorProvider.provider();


public NioSocketChannel() {
    // SelectorProvider实例用于创建JDK的SocketChannel实例
    this(DEFAULT_SELECTOR_PROVIDER);
}


public NioSocketChannel(SelectorProvider provider) {
    // newSocket会创建JDK的SocketChannel实例
    this(newSocket(provider));
}
newSocket会创建一个NIO的SocketChannel实例。
private static SocketChannel newSocket(SelectorProvider provider) {
    try {
        return provider.openSocketChannel();
    } catch (IOException e) {
        throw new ChannelException("Failed to open a socket.", e);
    }
}
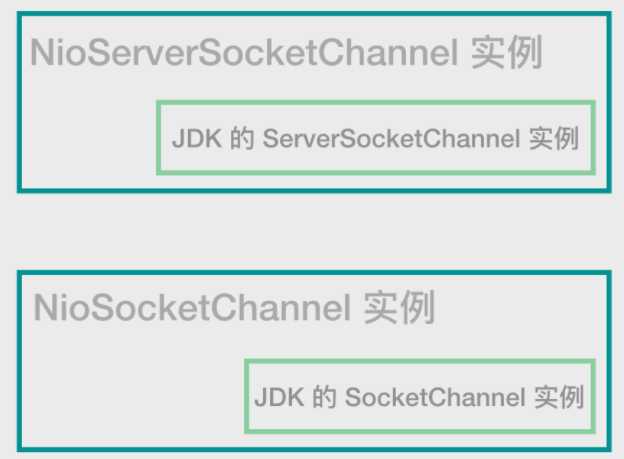
NioSocketChannel 在实例化过程中,会先实例化 JDK 底层的 SocketChannel,NioServerSocketChannel 也一样,会先实例化 ServerSocketChannel 实例。
NioSocketChannel构造方法还有:
public NioSocketChannel(Channel parent, SocketChannel socket) {
    // 设置属性,非阻塞
    super(parent, socket);
    // 保存channel的配置信息
    config = new NioSocketChannelConfig(this, socket.socket());
}
三、Future、Promise
JDK future
JDK future例子:
package cn.orzlinux.nettysource;

import java.util.concurrent.*;

public class JDKFuture {
    public static void main(String[] args) throws InterruptedException, ExecutionException {
        // 1970年至今的毫秒数
        long l = System.currentTimeMillis();
        ExecutorService executorService = Executors.newSingleThreadExecutor();
        // 将回调接口交给线程池执行,非阻塞,返回结果占位符future
        Future<Integer> future = executorService.submit(new Callable<Integer>() {
            @Override
            public Integer call() throws Exception {
                System.out.println("执行耗时操作。。。");
                timeConsumingOperation();
                return 1;
            }
        });
        // get阻塞直到结果完成
        System.out.println("计算结果"+future.get());
        System.out.println("主线程运算耗时:" + (System.currentTimeMillis() - l) + " ms");
    }

    private static void timeConsumingOperation() {
        try {
            Thread.sleep(3000);
        } catch (Exception e) {
            e.printStackTrace();
        }
    }
}

// 结果:
// 执行耗时操作。。。
// 计算结果1
// 主线程运算耗时:3012 ms
对应的netty计算例子:回调式
package cn.orzlinux.nettysource;

import io.netty.util.concurrent.DefaultEventExecutorGroup;
import io.netty.util.concurrent.EventExecutorGroup;
import io.netty.util.concurrent.Future;
import io.netty.util.concurrent.FutureListener;

import java.util.concurrent.Callable;
import java.util.concurrent.CountDownLatch;
import java.util.concurrent.ExecutionException;


public class NettyFuture {
    public static void main(String[] args) throws InterruptedException, ExecutionException {
        // 1970年至今的毫秒数
        long l = System.currentTimeMillis();
        CountDownLatch countDownLatch = new CountDownLatch(1);
        EventExecutorGroup group = new DefaultEventExecutorGroup(4);
        Future<Integer> future = group.submit(new Callable<Integer>() {
            @Override
            public Integer call() throws Exception {
                System.out.println("执行耗时操作。。。");
                timeConsumingOperation();
                return 1;
            }
        });
        future.addListener(new FutureListener<Object>(){

            @Override
            public void operationComplete(Future<Object> objectFuture) throws Exception {
                System.out.println("计算结果"+objectFuture.get());
                countDownLatch.countDown();
            }
        });
        System.out.println("主线程运算耗时:" + (System.currentTimeMillis() - l) + " ms");
        countDownLatch.await(); // 不让守护线程退出
        System.out.println("程序退出");
    }

    private static void timeConsumingOperation() {
        try {
            Thread.sleep(3000);
        } catch (Exception e) {
            e.printStackTrace();
        }
    }
}
// 结果:
// 主线程运算耗时:218 ms
// 执行耗时操作。。。
// 计算结果1
// 程序退出
jdk1.8提供了回调方式:CompletableFuture。
package cn.orzlinux.nettysource;

import io.netty.util.concurrent.DefaultEventExecutorGroup;
import io.netty.util.concurrent.EventExecutorGroup;
import io.netty.util.concurrent.FutureListener;

import java.util.concurrent.Callable;
import java.util.concurrent.CompletableFuture;
import java.util.concurrent.CountDownLatch;
import java.util.concurrent.ExecutionException;

public class CompletableFutureDemo {
    public static void main(String[] args) throws InterruptedException, ExecutionException {
        // 1970年至今的毫秒数
        long l = System.currentTimeMillis();
        CountDownLatch countDownLatch = new CountDownLatch(1);
        EventExecutorGroup group = new DefaultEventExecutorGroup(4);
        CompletableFuture<Integer> completableFuture = CompletableFuture.supplyAsync(()->{
            System.out.println("执行耗时操作。。。");
            timeConsumingOperation();
            return 1;
        });

        completableFuture.whenComplete((result,e)->{
                System.out.println("计算结果"+result);
                countDownLatch.countDown();
            });
        System.out.println("主线程运算耗时:" + (System.currentTimeMillis() - l) + " ms");
        countDownLatch.await(); // 不让守护线程退出
        System.out.println("程序退出");
    }

    private static void timeConsumingOperation() {
        try {
            Thread.sleep(3000);
        } catch (Exception e) {
            e.printStackTrace();
        }
    }
}

// 执行耗时操作。。。
// 主线程运算耗时:285 ms
// 计算结果1
// 程序退出
解决回调地狱方式:
// asyncFunc1(opt, (...args1) => {
//   asyncFunc2(opt, (...args2) => {
//       asyncFunc3(opt, (...args3) => {
//            asyncFunc4(opt, (...args4) => {
//                // some operation
//            });
//        });
//    });
//});
public static void main(String[] args) throws InterruptedException {
    long l = System.currentTimeMillis();
    CompletableFuture<Integer> completableFuture = CompletableFuture.supplyAsync(() -> {
        System.out.println("在回调中执行耗时操作...");
        timeConsumingOperation();
        return 100;
    });
    completableFuture = completableFuture.thenCompose(i -> {
        return CompletableFuture.supplyAsync(() -> {
            System.out.println("在回调的回调中执行耗时操作...");
            timeConsumingOperation();
            return i + 100;
        });
    });//<1>
    completableFuture.whenComplete((result,e)->{
        System.out.println("计算结果:" + result);
    });
    System.out.println("主线程运算耗时:" + (System.currentTimeMillis() - l) + " ms");
    new CountDownLatch(1).await();
}
netty Future
java.util.concurrent.Future:
public interface Future<V> {
    // 取消该任务
    boolean cancel(boolean mayInterruptIfRunning);
    // 任务是否已取消
    boolean isCancelled();
    // 任务是否已完成
    boolean isDone();
    // 阻塞获取任务执行结果
    V get() throws InterruptedException, ExecutionException;
    // 带超时参数的获取任务执行结果
    V get(long timeout, TimeUnit unit)
        throws InterruptedException, ExecutionException, TimeoutException;
}
netty中的future接口继承了JDK中的Future接口,添加了一些方法:
public interface Future<V> extends java.util.concurrent.Future<V> {
    // 是否成功
    boolean isSuccess();
    // 是否可取消
    boolean isCancellable();
    // 如果任务执行失败,返回异常信息
    Throwable cause();
     // 添加 Listener 来进行回调
    Future<V> addListener(GenericFutureListener<? extends Future<? super V>> var1);
    Future<V> addListeners(GenericFutureListener<? extends Future<? super V>>... var1);
    Future<V> removeListener(GenericFutureListener<? extends Future<? super V>> var1);
    Future<V> removeListeners(GenericFutureListener<? extends Future<? super V>>... var1);
    // 阻塞等待任务结束,如果任务失败,将“导致失败的异常”重新抛出来
    Future<V> sync() throws InterruptedException;
    // 不响应中断的 sync()
    Future<V> syncUninterruptibly();
    // 阻塞等待任务结束,和 sync() 功能是一样的,不过如果任务失败,它不会抛出执行过程中的异常
    Future<V> await() throws InterruptedException;
    Future<V> awaitUninterruptibly();
    boolean await(long var1, TimeUnit var3) throws InterruptedException;
    boolean await(long var1) throws InterruptedException;
    boolean awaitUninterruptibly(long var1, TimeUnit var3);
    boolean awaitUninterruptibly(long var1);
    // 获取执行结果,不阻塞。我们都知道 java.util.concurrent.Future 中的 get() 是阻塞的
    V getNow();

    boolean cancel(boolean var1);
}
netty 的Future接口,与 jdk 的Future相比,增加了阻塞等待,和任务回调。
sync 和 await区别:
public Promise<V> sync() throws InterruptedException {
    this.await();
    this.rethrowIfFailed();
    return this;
}
sync内部调用了 await方法,重新抛出异常。
常用的是其子接口ChannelFuture,和 IO 操作中的Channel关联在一起了。
netty Promise
Promise继承自Netty的Future接口。
public interface Promise<V> extends Future<V> {
    // 标记future为成功,并设置执行结果,通知所有listeners。
    // 如果失败,抛出异常(失败指该future已经有结果了。)
    Promise<V> setSuccess(V var1);

    // 同上,只是失败不抛出异常,返回false
    boolean trySuccess(V var1);

    Promise<V> setFailure(Throwable var1);
    boolean tryFailure(Throwable var1);

    // 标记该 future 不可以被取消
    boolean setUncancellable();

    Promise<V> addListener(GenericFutureListener<? extends Future<? super V>> var1);
    Promise<V> addListeners(GenericFutureListener<? extends Future<? super V>>... var1);
    Promise<V> removeListener(GenericFutureListener<? extends Future<? super V>> var1);
    Promise<V> removeListeners(GenericFutureListener<? extends Future<? super V>>... var1);

    Promise<V> await() throws InterruptedException;
    Promise<V> awaitUninterruptibly();
    Promise<V> sync() throws InterruptedException;
    Promise<V> syncUninterruptibly();
}
Promise实例内部是一个任务,任务执行通常异步,有一个线程池来处理任务。setSuccess或者setFailure会在某个执行任务的线程执行完成后调用,之后调用回调函数。而且,一旦set之后,await或者sync就会返回。
ChannelPromise接口用的较多。
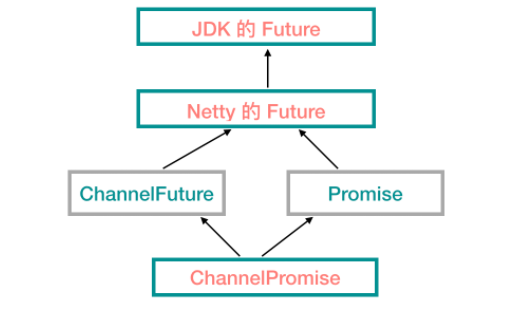
public interface ChannelPromise extends ChannelFuture, Promise<Void> {

    @Override
    Channel channel();

    @Override
    ChannelPromise setSuccess(Void result);

    ChannelPromise setSuccess();

    boolean trySuccess();

    @Override
    ChannelPromise setFailure(Throwable cause);

    @Override
    ChannelPromise addListener(GenericFutureListener<? extends Future<? super Void>> listener);

    @Override
    ChannelPromise addListeners(GenericFutureListener<? extends Future<? super Void>>... listeners);

    @Override
    ChannelPromise removeListener(GenericFutureListener<? extends Future<? super Void>> listener);

    @Override
    ChannelPromise removeListeners(GenericFutureListener<? extends Future<? super Void>>... listeners);

    @Override
    ChannelPromise sync() throws InterruptedException;

    @Override
    ChannelPromise syncUninterruptibly();

    @Override
    ChannelPromise await() throws InterruptedException;

    @Override
    ChannelPromise awaitUninterruptibly();

    /**
     * Returns a new {@link ChannelPromise} if {@link #isVoid()} returns {@code true} otherwise itself.
     */
    ChannelPromise unvoid();
}
它综合了 ChannelFuture 和 Promise 中的方法,只不过通过覆写将返回值都变为 ChannelPromise 了而已,没有增加什么新的功能。
接下来看一个比较常用的实现类DefaultPromise。
public class DefaultPromise<V> extends AbstractFuture<V> implements Promise<V> {
    // 保存执行结果
    private volatile Object result;
    // 执行任务的线程池,任务其实没必要知道自己在哪里执行
    // TODO
    private final EventExecutor executor;
    // 回调函数,任务结束后执行
    private Object listeners;
    // 等待这个Promise的线程数
    private short waiters;
    // 是否正在唤醒等待线程,防止重复执行唤醒
    private boolean notifyingListeners;
    // ...
}
其中,set方法:
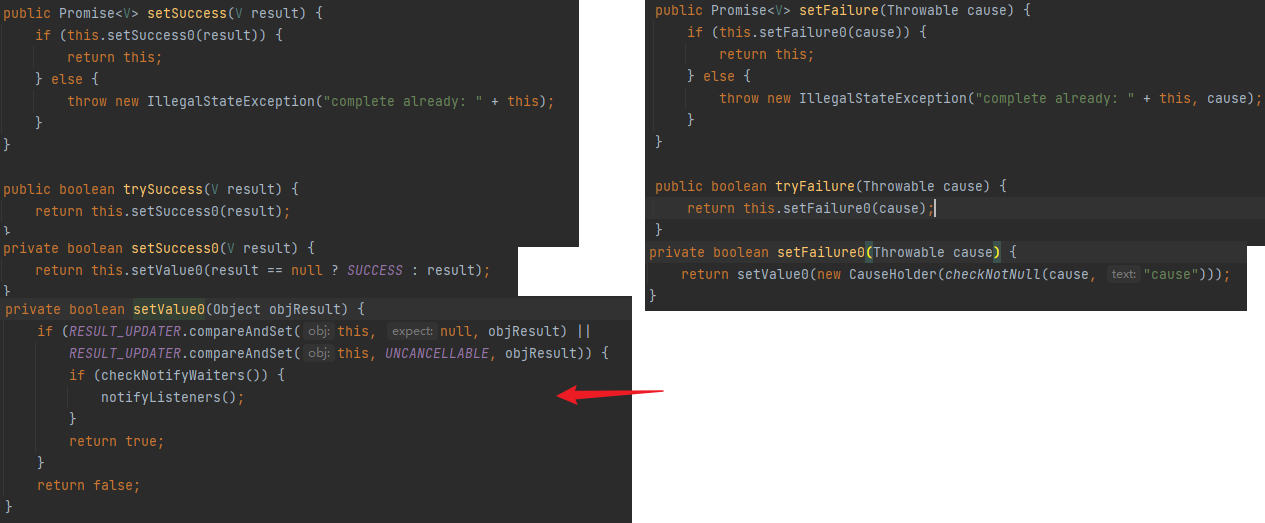
set方法利用cas设置好值,唤醒阻塞在sync或者await的线程,之后执行回调函数。
例子使用:
package cn.orzlinux.nettysource;

import io.netty.channel.ChannelPromise;
import io.netty.util.concurrent.*;

public class NettyPromise {
    public static void main(String[] args) {
        // 构造线程池
        EventExecutor executor = new DefaultEventExecutor();
        Promise promise = new DefaultPromise(executor);
        // 给promise添加两个listener
        promise.addListener(new GenericFutureListener<Future<Integer>>() {
            @Override
            public void operationComplete(Future future) throws Exception {
                if(future.isSuccess()) {
                    System.out.println("成功,结果:"+future.get());
                } else {
                    System.out.println("失败,异常:"+future.cause());
                }
            }
        }).addListener((GenericFutureListener<Future<Integer>>) future -> System.out.println("任务结束。。。"));

        // 提交任务到线程池,执行结束后,设置执行promise的结果
        executor.submit(new Runnable() {
            @Override
            public void run() {
                try {
                    Thread.sleep(5000);
                } catch (Exception e) {
                    e.printStackTrace();
                }
                // 设置promise的结果
                //任务结束以后,需要调用 promise.setSuccess(result) 作为通知
                promise.setSuccess("1234");
                // 结果:
                //成功,结果:1234
                //任务结束。。。

                // ================================
                // promise.setFailure(new Throwable("fail test"));
                // 输出:
                // 失败,异常:java.lang.Throwable: fail test
                // 任务结束。。。
                // Exception in thread "main" java.lang.Throwable: fail test

            }
        });

        // main线程阻塞等待执行结果
        try {
            promise.sync();
        } catch (InterruptedException e) {
            e.printStackTrace();
        }
    }
}
四、Pipeline
使用Netty时,我们通常就是要写一些handler,组成一个pipeline,用于处理IO事件。
每个channel内部有一个pipeline,pipeline由多个handler组成,handler之间顺序很重要,IO事件将按照顺序依次经过pipeline上的handler,这样每个 handler 可以专注于做一点点小事,由多个 handler 组合来完成一些复杂的逻辑。

这是一个双向链表。
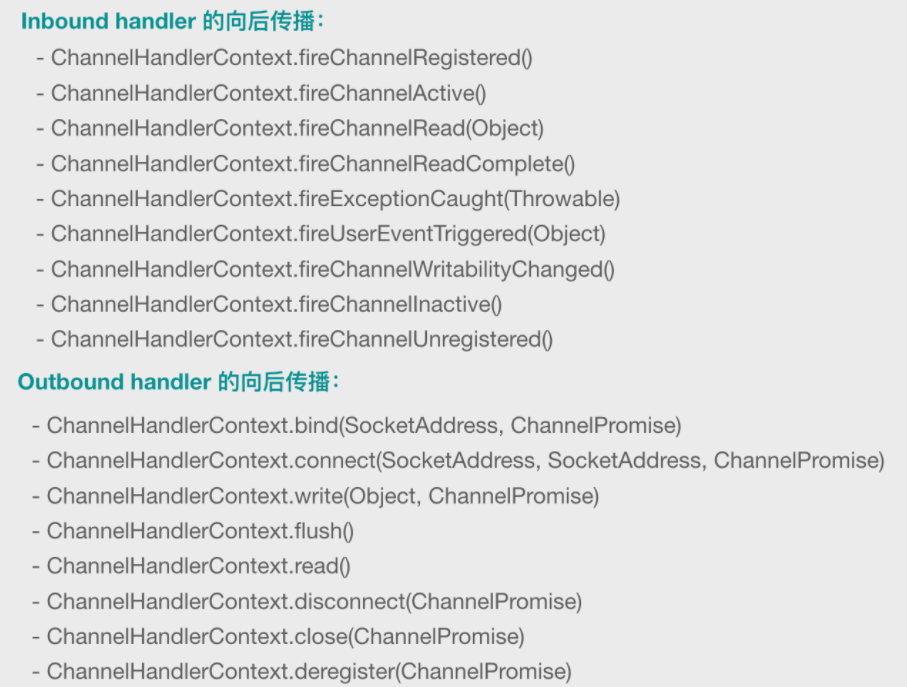
Netty中,IO事件被分为Inbound事件和Outbound事件。如connect,write,flush属于Outbound事件。 accept、read 这种就属于 Inbound 事件。
如常用的代码:
1. pipeline.addLast(new StringDecoder());
2. pipeline.addLast(new StringEncoder());
3. pipeline.addLast(new BizHandler()); // 处理业务逻辑
按理来说顺序应该为1️⃣ -> 3️⃣ -> 2️⃣。
原因:分组的,Inbound和Outbound。也就是read的时候,是inbound,先1,再3。处理完返回的时候,outbound,用的是2。所以虽然这样写,其实是1️⃣ -> 3️⃣ -> 2️⃣的顺序。
如果再有一个呢?
4. pipeline.addLast(new OutboundHandlerA());
1️⃣ -> 3️⃣ -> 4️⃣ -> 2️⃣。因为out的时候是链表返回来的。
那我们在开发的时候怎么写呢?其实也很简单,从最外层开始写,一步步写到业务处理层,把 Inbound 和 Outbound 混写在一起。比如 encode 和 decode 是属于最外层的处理逻辑,先写它们。假设 decode 以后是字符串,那再进来一层应该可以写进来和出去的日志。再进来一层可以写 字符串 <=> 对象 的相互转换。然后就应该写业务层了。
Inbound事件和Outbound事件:
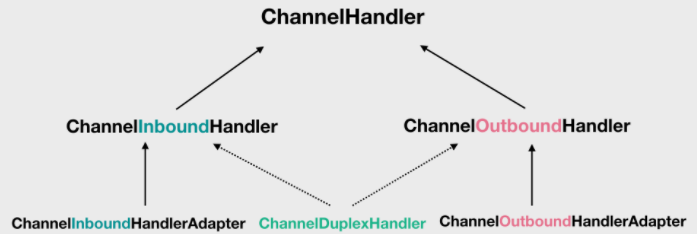
如果我们希望定义一个 handler 能同时处理 Inbound 和 Outbound 事件,可以通过继承中间的 ChannelDuplexHandler 的方式,比如 LoggingHandler 这种既可以用来处理 Inbound 也可以用来处理 Outbound 事件的 handler。
AbstractChannel构造方法:
protected AbstractChannel(Channel parent) {
    this.parent = parent;
    // 给每个 channel 分配一个唯一 id
    id = newId();
    // 每个 channel 内部需要一个 Unsafe 的实例
    unsafe = newUnsafe();
    // 每个 channel 内部都会创建一个 pipeline
    pipeline = newChannelPipeline();
}
在JDK源码中,sun.misc.Unsafe类提供了一些底层操作的能力,是设计出来给 JDK 的源码用的,如AQS、ConcurrentHashMap等。
Unsafe unsafe = Unsafe.getUnsafe();
// 编译无问题,运行抛java.lang.SecurityException异常,因为就不是给用户用的

// 上面源码
public static Unsafe getUnsafe() {
    Class var0 = Reflection.getCallerClass();
    if (!VM.isSystemDomainLoader(var0.getClassLoader())) {
        throw new SecurityException("Unsafe");
    } else {
        return theUnsafe;
    }
}
getUnsafe()前面有个验证,抛出security异常,可以用反射绕过异常。
// private static final Unsafe theUnsafe;
Field field = Unsafe.class.getDeclaredField("theUnsafe");
field.setAccessible(true);
Unsafe unsafe = (Unsafe) field.get(null);
同样,Netty中的Unsafe也是给Netty源码用的,封装了JDK提供了NIO接口。
继续pipeline。
在AbstractChannel中,实例化pipeline。
protected DefaultChannelPipeline newChannelPipeline() {
    return new DefaultChannelPipeline(this);
}
DefaultChannelPipeline的构造方法如下:
final AbstractChannelHandlerContext head;
final AbstractChannelHandlerContext tail;
protected DefaultChannelPipeline(Channel channel) {
    this.channel = ObjectUtil.checkNotNull(channel, "channel");
    succeededFuture = new SucceededChannelFuture(channel, null);
    voidPromise =  new VoidChannelPromise(channel, true);

    tail = new TailContext(this);
    head = new HeadContext(this);

    head.next = tail;
    tail.prev = head;
}
这里实例化了两个handler。

pipeline 中的每个元素是 ChannelHandlerContext 的实例,而不是 ChannelHandler 的实例,context 包装了一下 handler。
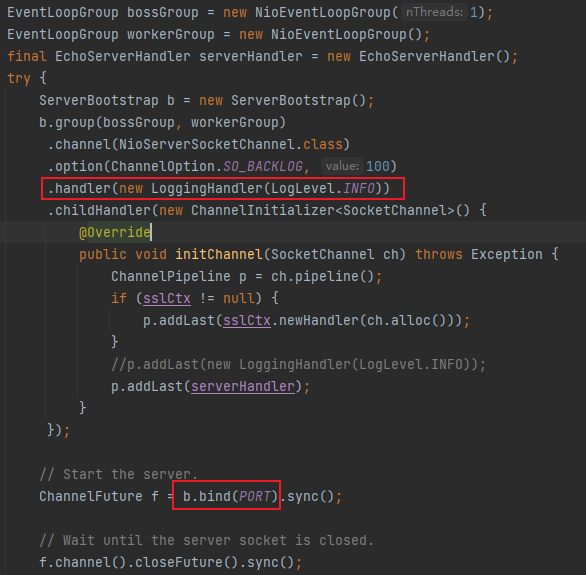
handler指定了一个实例,进入bind看一下怎么进入pipeline的。
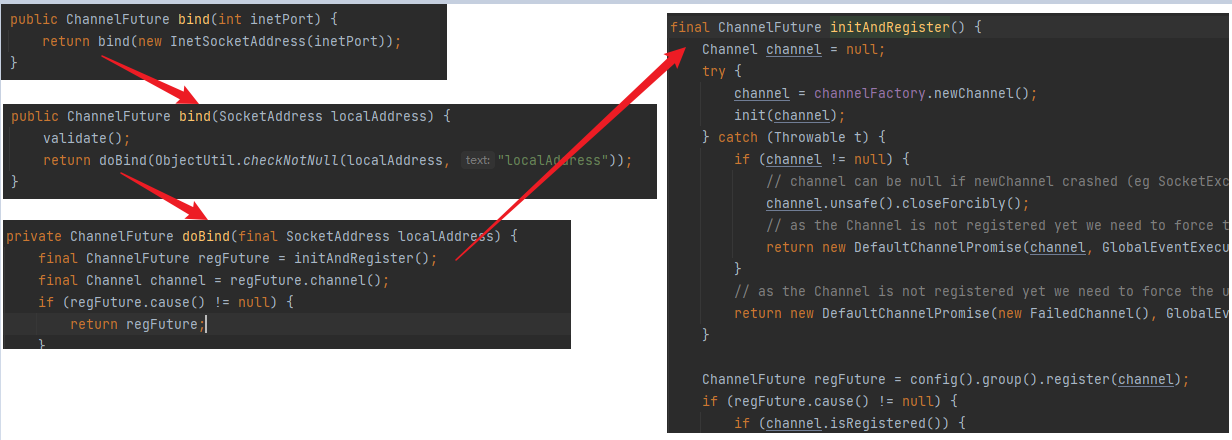
在initAndRegister中:
final ChannelFuture initAndRegister() {
    Channel channel = null;
    try {
        // 构造channel实例,同时会构造pipeline实例
        // pipeline有head和tail两个handler了。
        channel = channelFactory.newChannel();
        // 看下文
        init(channel);
    } catch (Throwable t) {
        。。。
}
init是一个抽象方法:
// AbstractBootstrap.java
abstract void init(Channel channel) throws Exception;
实现类有在ServerBootstrap和Bootstrap里面,如ServerBootstrap:
private final ServerBootstrapConfig config = new ServerBootstrapConfig(this);

@Override
void init(Channel channel) {
    setChannelOptions(channel, newOptionsArray(), logger);
    setAttributes(channel, newAttributesArray());
    // 拿到pipeline实例
    ChannelPipeline p = channel.pipeline();

    final EventLoopGroup currentChildGroup = childGroup;
    final ChannelHandler currentChildHandler = childHandler;
    final Entry<ChannelOption<?>, Object>[] currentChildOptions = newOptionsArray(childOptions);
    final Entry<AttributeKey<?>, Object>[] currentChildAttrs = newAttributesArray(childAttrs);
    // 开始往 pipeline 中添加一个 handler,这个 handler 是 ChannelInitializer 的实例
    p.addLast(new ChannelInitializer<Channel>() {
        @Override
        public void initChannel(final Channel ch) {
            final ChannelPipeline pipeline = ch.pipeline();
            // 这个方法返回我们最开始指定的 LoggingHandler 实例
            ChannelHandler handler = config.handler();
            if (handler != null) {
                // 添加 LoggingHandler
                pipeline.addLast(handler);
            }

            ch.eventLoop().execute(new Runnable() {
                @Override
                public void run() {
                    // 添加一个 handler 到 pipeline 中:ServerBootstrapAcceptor
                    // 从名字可以看到,这个 handler 的目的是用于接收客户端请求
                    pipeline.addLast(new ServerBootstrapAcceptor(
                            ch, currentChildGroup, currentChildHandler, currentChildOptions, currentChildAttrs));
                }
            });
        }
    });
}
这里涉及到 pipeline 中的辅助类 ChannelInitializer,我们看到,它本身是一个 handler(Inbound 类型),但是它的作用和普通 handler 有点不一样,它纯碎是用来辅助将其他的 handler 加入到 pipeline 中的。

ChannelInitializer 的 initChannel(channel) 方法被调用的时候,会往 pipeline 中添加我们最开始指定的 LoggingHandler 和添加一个 ServerBootstrapAcceptor。但是我们现在还不知道这个 initChannel 方法何时会被调用。
LoggingHandler 这样的 handler现在还不在 pipeline 中,那么什么时候会真正进入到 pipeline 中呢?后文会谈。
